-
GameLift 사용법AWS/Gamelift 2021. 5. 17. 12:33
1. 윈도우용 CMake 사용(다운로드)


설치시 옵션 선택 
환경 변수 새로 만들기 버튼 
환경 변수 추가
VS150COMNTOOLS
C:\Program Files (x86)\Microsoft Visual Studio\2019\Community\Common7\Tools2. Git 설치 (있어야 진행이됨)

3. aws gamelift 서버 sdk 다운로드

압축해제 후
.../GameLift_12_22_2020/GameLift-SDK-Release-4.0.2/GameLift-Cpp-ServerSDK-3.4.1
에 out 폴더 생성out 폴더 경로에서 cmd 실행
cmake --version 으로 제대로 작동하는지 확인후
cmake -G "Visual Studio 16 2019" -A x64 -DBUILD_FOR_UNREAL=1 ..
.../out/prefix 밑의 bin 과 lib 폴더 하위에 각각
aws-cpp-sdk-gamelift-server.dll
aws-cpp-sdk-gamelift-server.lib
생성됨생성된 두 파일을
...GameLift-SDK-Release-4.0.2/GameLift-Unreal-plugin-3.3.3/UE4.25/GameLiftServerSDK/ThirdParty/GameLiftServerSDK/Win64
내부로 이동 시킴

4. 프로젝트에 적용
sdk의 UE4.25 밑의 GameLiftServerSDK 폴더를 복사해
프로젝트의 Plugins 폴더 밑으로 붙여넣기

.uproject 파일을 메모장으로 열어 플러그인 사용 추가 / 이걸로 해서 문제 생기면 에디터 켜서 하면 됨

{
"Name": "GameLiftServerSDK",
"Enabled": true
}
project.Build.cs 파일 내용 수정 - sdk 명시
PublicDependencyModuleNames.AddRange(new string[] {.......,
"GameLiftServerSDK" //추가
});
.uproject 파일을 이용해 sln 파일 다시 생성

sln 파일 이용해 소스코드 편집 메인 인스턴스에 내용 추가
instance.h 추가 내용
//클래스 전방 선언
class FGameLiftServerSDKModule;
//메소드 추가
public:void InitGameLiftSDK(); //sdk 초기화 내용
UFUNCTION(BlueprintCallable, Category = "GameLift")
void AcceptPlayerSession(const FString& playerSessionId);//DS 서버에 플레이어가 입장할 때 호출
UFUNCTION(BlueprintCallable, Category = "GameLift")
void RemovePlayerSession(const FString& playerSessionId);//DS 서버에서 플레이어가 퇴장할 때 호출
private:FGameLiftServerSDKModule* GameLiftSdkModule;//게임모듈 저장용 변수
instance.cpp 내용
//sdk include
#include <GameLiftServerSDK.h>
생성자()
GameLiftSdkModule = nullptr; //모듈 저장 변수 초기화
Init 메소드()
InitGameLiftSDK(); 호출
void UDBroneGameInstance::InitGameLiftSDK()
{#if WITH_GAMELIFT
GameLiftSdkModule = &FModuleManager::LoadModuleChecked<FGameLiftServerSDKModule>(FName("GameLiftServerSDK"));
FGameLiftGenericOutcome GameLiftGenericOutcome = GameLiftSdkModule->InitSDK();
if (GameLiftGenericOutcome.IsSuccess())
{
FProcessParameters* params = new FProcessParameters();
auto onGameSession = [=](Aws::GameLift::Server::Model::GameSession gameSession)
{
GameLiftSdkModule->ActivateGameSession();
};
params->OnStartGameSession.BindLambda(onGameSession);
auto onUpdateGameSession = [=](Aws::GameLift::Server::Model::UpdateGameSession updateGameSession)
{
UE_LOG(LogTemp, Log, TEXT("[GameLiftSDK] Game session has updated."));
};
params->OnUpdateGameSession.BindLambda(onUpdateGameSession);params->OnTerminate.BindLambda([=]()
{
GameLiftSdkModule->TerminateGameSession();//추가
GameLiftSdkModule->ProcessEnding();
UE_LOG(LogTemp, Log, TEXT("[GameLiftSDK] Game session has terminated."));
});
params->OnHealthCheck.BindLambda([]() { return true; });
params->port = 7777;
FString port;
if (FParse::Value(FCommandLine::Get(), TEXT("Port="), port) && port.Len() > 0)
{
params->port = FCString::Atoi(*port);
}
UE_LOG(LogTemp, Log, TEXT("[GameLiftSDK] Port is assigned to %d."), params->port);
TArray<FString> logfiles;
logfiles.Add(TEXT("/local/game/ProjectJB/Saved/Logs"));//교체
params->logParameters = logfiles;
GameLiftSdkModule->ProcessReady(*params);
UE_LOG(LogTemp, Log, TEXT("[GameLiftSDK] process is ready."));
}
else
{
UE_LOG(LogTemp, Log, TEXT("[GameLiftSDK] initialized failed."));
}
#endif
}
void UDBroneGameInstance::AcceptPlayerSession(const FString& playerSessionId)
{
#if WITH_GAMELIFT
if (GameLiftSdkModule)
{
UE_LOG(LogTemp, Log, TEXT("[GameLiftSDK] Player session accepting. playerSessionId: %s"), *playerSessionId);
auto ret = GameLiftSdkModule->AcceptPlayerSession(playerSessionId);
if (ret.IsSuccess())
{
UE_LOG(LogTemp, Log, TEXT("[GameLiftSDK] Player session accepting success."));
}
else
{
UE_LOG(LogTemp, Error, TEXT("[GameLiftSDK] Player session accepting fail: %d %s"),ret.GetError().m_errorType,
*(ret.GetError().m_errorMessage));
}
}
#endif
}
void UDBroneGameInstance::RemovePlayerSession(const FString& playerSessionId)
{
#if WITH_GAMELIFT
if (GameLiftSdkModule)
{
UE_LOG(LogTemp, Log, TEXT("[GameLiftSDK] Player session removing. playerSessionId: %s"), *playerSessionId);
auto ret = GameLiftSdkModule->RemovePlayerSession(playerSessionId);
if (ret.IsSuccess())
{
UE_LOG(LogTemp, Log, TEXT("[GameLiftSDK] Player session removing success."));
}
else
{
UE_LOG(LogTemp, Error, TEXT("[GameLiftSDK] Player session removing fail: %d %s"),ret.GetError().m_errorType,
*(ret.GetError().m_errorMessage));
}
}
#endif
}완료 되었다면 c++ 코드 빌드, 서버 빌드
5.로컬 테스트
java sdk 설치(java 필요함)

GameLift sdk 전체를 압축해제한 폴더 내부에 로컬 테스트용 폴더 경로로 이동해 cmd 띄우기
( .../GameLift_12_22_2020/GameLiftLocal-1.0.5 )
GameLifgLocal.jar 실행
java -jar GameLiftLocal.jar -p 9080프로젝트 서버 실행

정상적이라면
Local test log 창이 추가로 기재되고 있고

프로그램 서버 로그에도 sdk 초기화 port 정보등
정상적으로 진행 됨, 로컬 테스트 앱이 구동중이 아니라면 진행이 안됨!!

6. 빌드 업로드 위한 준비
Visual C++ Redistributable for Visual Studio


서버 빌드가 있는 WindowsServer 폴더 밑에 해당 파일 복붙

메모장 열고 아래 내용 입력후 그 파일의 이름을 install.bat 으로 바꾼후 서버 빌드가 있는 WindowsServer 폴더 밑에 해당 파일 복붙
VC_redist.x64.exe /q
Engine\Extras\Redist\en-us\UE4PrereqSetup_x64.exe /q

build upload
아무 경로에서
aws gamelift upload-build --name "TestServerBuild" --build-version 0.9.1 --build-root "D:\DoubleBears\DroneBuild\WindowsServer" --operating-system WINDOWS_2012 --region ap-northeast-2
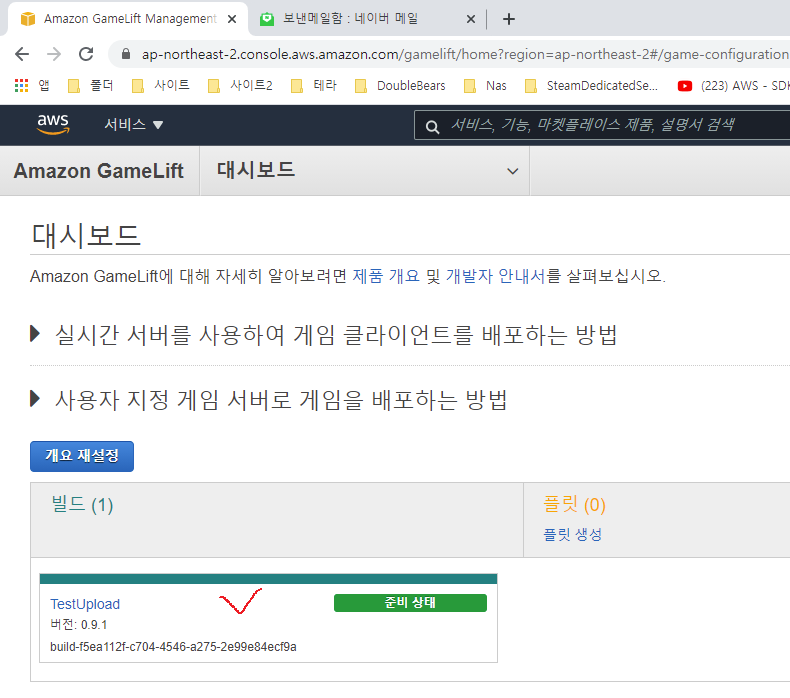
7. 업로드 이후 작업
AWS 콘솔로 이동 / Gamelift 서비스로 이동 테스트로 올린 빌드가 업로드 되어 있음을 볼 수 있다. 클릭!


경로에는 WindowsServer 이하 경로를 써 준다.
(ex: DBDroneSimulatorTest\Binaries\Win64\DBDroneSimulatorTestServer.exe )
port는 7777과 7778로 두개를 만들어준다.
( -port 7777 , -port 7778 )

오른쪽 끝의 체크 모양 버튼을 눌러서 확인해줘야함

port 설정 , UDP로 변경

이제 플릿 초기화

생성된 후 이벤트 탭에서 이력을 보면 잘 생성 됐다는 메세지 발견 그러나 아직 활성화 된 것은 아니다.

시간이 지나면서 점차 준비가 되어감 -> 활성화 완료

scaling 에서는 인스턴스 수 조절을 할 수 있고


Capacity allocation 에서는 돌아가는 서버 프로세스를 확인 가능

콘솔에서 하는 방법은 이러하고 comand line 으로 하는 방법은 아래와 같다
빌드 업로드
-> 윈도우 빌드의 경우
aws gamelift upload-build^
--name "DroneWindowsBuild"^
--build-version 0.9.1^
--build-root "./WindowsServer"^
--operating-system WINDOWS_2012^
--region ap-northeast-2
-> 리눅스 빌드의 경우aws gamelift upload-build^
--name "DroneLinuxBuild"^
--build-version 0.9.1^
--build-root "./LinuxServer"^
--operating-system AMAZON_LINUX^
--region ap-northeast-2fleet 생성
-> 윈도우 빌드의 경우
set BUILD_VERSION=build-37ff9517-e6ae-4d1b-8956-ab09e3bc973a
aws gamelift create-fleet^
--name "DroneRace"^
--description "DroneRace"^
--ec2-instance-type "c5.large"^
--fleet-type "SPOT"^
--build-id "%BUILD_VERSION%"^
--runtime-configuration "GameSessionActivationTimeoutSeconds=300, MaxConcurrentGameSessionActivations=2, ServerProcesses=[{LaunchPath=C:\game\DBDroneSimulatorTest\Binaries\Win64\DBDroneSimulatorTestServer.exe, Parameters=RaceLobby -log -Port=7777, ConcurrentExecutions=1}]"^
--new-game-session-protection-policy "NoProtection"^
--ec2-inbound-permissions "FromPort=7777,ToPort=7778,IpRange=0.0.0.0/0,Protocol=UDP" "FromPort=3389,ToPort=3389,IpRange=0.0.0.0/0,Protocol=TCP"-> 리눅스 빌드의 경우
set BUILD_VERSION=build-70874d30-6cb2-4352-aa21-35e03897d71a
aws gamelift create-fleet^
--name "DroneRace_Linux"^
--description "DroneRace_Linux"^
--ec2-instance-type "c5.large"^
--fleet-type "SPOT"^
--build-id "%BUILD_VERSION%"^
--runtime-configuration "GameSessionActivationTimeoutSeconds=300, MaxConcurrentGameSessionActivations=2, ServerProcesses=[{LaunchPath=/local/game/DBDroneSimulatorTest/Binaries/Linux/DBDroneSimulatorTestServer, Parameters=RaceLobby -server -log -Port=7777, ConcurrentExecutions=1}]"^
--new-game-session-protection-policy "NoProtection"^
--ec2-inbound-permissions "FromPort=7777,ToPort=7778,IpRange=0.0.0.0/0,Protocol=UDP" "FromPort=22,ToPort=22,IpRange=0.0.0.0/0,Protocol=TCP"'AWS > Gamelift' 카테고리의 다른 글
Gamelift Instance 원격 접속 (0) 2021.04.20